
Curved planar reformation (CPR)
Unfold images along manual 3D paths, link reference views and cross-sections, and retain physical measurements.
On this page
Open CPR
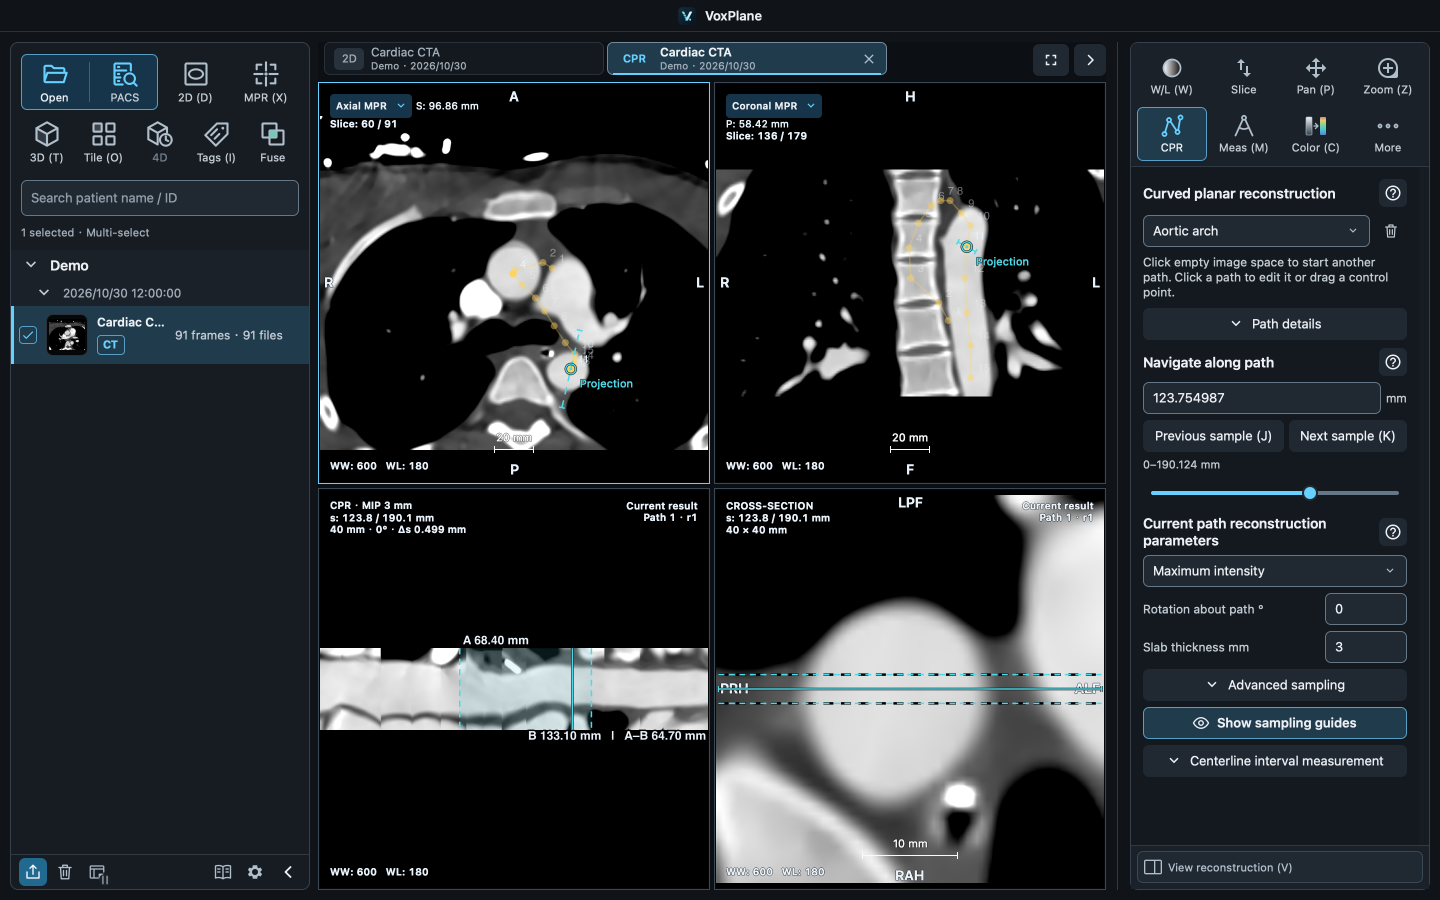
Open CPR from the CT / MR series menu or More → CPR in MPR. Finishing preserves the current reference layout. Choose View reconstruction to open the curved and cross-section views and View reference images to return. The default toggle is V. Drag the divider to resize the results.
Draw a 3D path
A new CPR tab starts in drawing mode. Click to place a point or drag and release to position it in a reference image, including across slices and planes. With at least two distinct points, Enter, double-click or Done commits the polyline in the current view. A double-click places no point and cancels a draft with fewer than two points. Backspace removes the last point, Esc cancels, and N starts a new path.
Editing and multiple paths
With the CPR tool selected, click empty image space to start another path. Click any path on the current reference slice to edit it, or drag a control point directly. The first segment click selects the path. A subsequent click in edit mode inserts a point. Delete or Backspace removes the selected path, even when a control point is selected. Use Delete selected point to remove one point. The trash button beside the path selector always deletes the whole path. R also enters edit mode. Enter or double-click finishes in place. Use the path list to switch, rename or delete paths. Current shortcuts appear after action names and can be changed in Settings. S/E mark interval endpoints, J/K step backward or forward, and V switches views. These shortcuts apply only while the CPR tool panel is open. Switching tools, collapsing the panel or closing its flyout releases the keys. Text and number fields retain keyboard input.
Linked views and sampling
Completing or selecting a path initially aligns both reference slices to its start (s=0); reference slices can still be browsed independently. Click the curved image, drag the slider or enter a distance to reach the nearest sample. A cyan station line marks the position and corresponds to the cyan sampling line in the cross-section. Reference views show the selected path’s sampling direction as a solid in-plane line, an end-on point, or a labeled dashed projection when oblique or off-plane. Thin samples one curved surface. Maximum and mean projections use the maximum or mean over the chosen slab in the curved image. The first projection uses 3 mm, subsequent selections recall the last positive thickness, and zero returns to Thin. Rotation changes the viewing direction about the path. Show sampling guides controls the cyan position and sampling markers in all four views. In the cross-section, it draws the curved width as a solid line and slab bounds as dashed lines. Corners show reconstructed settings and actual along-path spacing Δs. The cross-section field is shared by all paths in the tab. Navigate and choose Set start A and Set end B, or enter distances. The curved image marks the interval and its length along the path. Editing the interval preserves the displayed historical plane. Double-click while browsing to expand or restore. Scroll to move through reference slices or along the path in results. On a reconstructed path, press K, S, K, E in sequence to mark two adjacent samples as start A and end B. End caps mark the actual ends of the cross-section sampling line; outward chevrons indicate that it continues beyond the displayed area.
Measurement geometry
Ordinary length, angle and ROI measurements use the reference planes and perpendicular cross-section. A curved image is not a single physical plane and does not support ordinary quantitative measurements. Total and interval centerline lengths use the 3D path. After path edits or deletion, stored measurements can return to their original physical plane and show their saved path revision and position.
Saving, restoring and export
Workspaces retain paths, measurements, parameters and source locations without embedding images. Each time you open CPR from the series list, you start with an empty path. Click the original tab to continue an existing path. If you closed it, choose Workspace → Reopen closed tab. Missing or changed sources retain the records with a clear message. More → Export saves a curved image, cross-section or the current layout as PNG (two or four views), anonymously by default. Drafts, drag previews and unfinished reconstructions cannot be exported. CPR export currently uses PNG. Anonymous export retains reconstruction type, historical/current status, generated path number, revision and position while hiding patient identifiers, custom path names and text annotations.